Sunday, May 31, 2009

blueberry crumb bars

since i happen to have all the ingredients at home, i decided to make it:


blueberry bars (serves 16)

-1 cup white sugar
- 1 teaspoon baking powder
- 3 cups all-purpose flour
- 1 cup cold butter (250g)
- 1 egg
- 1/4 teaspoon salt
- Zest and juice of one lemon
- 4 cups fresh or frozen blueberries (remember to drain juice off if using frozen or canned berries)
- 1/3 cup white sugar
- 4 teaspoons cornstarch


1. Preheat the oven to (190 degrees C). Grease a 9×13 inch pan with butter or line with oven-paper to facilitate removing the end product later.

2. In a medium bowl, stir together 1 cup sugar, 3 cups flour, and baking powder. Mix in the salt and lemon zest.

3. Blend in the butter and egg and mix thoroughly. (I used my hands and found it to be much easier). Dough will be crumbly. Pat half of dough into the prepared pan.

4. In another bowl, stir together the sugar, cornstarch and lemon juice. Gently mix in the blueberries.

5. Sprinkle the blueberry mixture evenly over the crust. Crumble remaining dough over the berry layer.
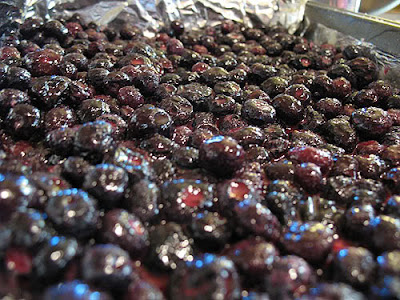


5. Bake in preheated oven for 45 minutes, or until top is slightly brown. Cool completely before cutting into squares (I chilled mine in the fridge for a bit). Makes 16 large bars.

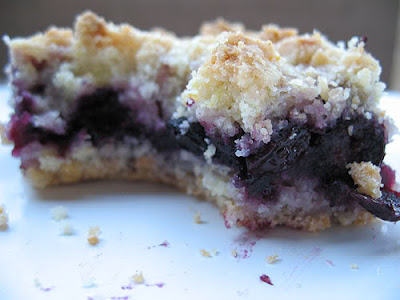


taken off smitten kitchen
pictures credited to crepes of wrath

Thursday, May 28, 2009

chicken pot pie soup

Took a day off from my service with the frog farm and made this dish i've been wanting to since forever:


chicken soup! courtesy of
crepes of wrath (serves 6-8)

3 cups cooked chicken (preferably breast meat) cubed or shredded
1 onion, diced
*2 carrots, chopped
2 cups potatoes, cubed (more if you are a fan of potatoes)
*1 can green peas, drained
*1 can corn, drained
6 tbsp unsalted butter
1 cup flour (all purpose/ plain)
2 chicken/vegetable cubes
2 cups chicken/vegetable broth
4 cups of milk (UHT)
1/2 tsp. pepper
1/4 tsp. garlic salt
Puff pastry dough or whatever else you like (i used delifrance baguette)

*i substituted carrots, peas and corns with 3/2 cups of mixed vegetables instead.


1. Put the potatoes in a pot with 1 cup of the broth and enough water to cover them. (I actually cooked the potatoe first and skinned it before doing this step.) At the same time, put your peeled and chopped carrots in a small pot with enough water to cover them. Cover and cook both vegetables until fork tender, about 15-20 minutes. (otherwise, boil the mix vegetables if you are using them instead.)

2. Meanwhile, saute your onions in a few teaspoons of olive oil until soft and translucent, about 8 minutes.


3. In a large pot, melt butter over medium-low heat. Add in bouillon, pepper, garlic, broth and flour. Stir until smooth.

4. Gradually add milk. Cook and stir over medium heat until it boils, simmer for a minute, stirring constantly.

5. Add chicken and then each vegetable one at time and stir carefully between each addition.

6. Roll out your pastry dough (if you’re using it) about 1/4 inch thick and cut into 3×3 inch squares. Bake in 190 degree in the oven for 7-10 minutes, until puffy and slightly browned on top. Serve on top of soup. (otherwise, i just cut the baguette into small pieces) Serves 6-8.


overall, an awesome dish which tasted like campbel soup! :) it was a pity i didnt share with the intended party cause of a tantrum i threw.

from back to the cutting board; enjoy!

Sunday, May 24, 2009

Stove top marcaroni and cheese

what better to do than to experiment simple and new dishes when you've got nothing better to do. whipped a simple, nonetheless fantabuolistic dish for jiaying when she came over on thursday:


marcaroni and cheese!
serves 2-3

- 6 slices bacon cut into chunks (minced meat would do, but bacon would still give the best taste
- 2 garlic cloves, minced
- 1 onion clove, minced
- salt
- 250g elbow macaroni
- 4 tablespoons butter
- 2 tablespoons plain flour
- 1 1/2 cups UHT fresh milk
- shredded parmesan cheese
- ground black pepper
- optional: lemon juice


1. In a wok, cook bacon until crisp. Set the bacon aside to drain on paper towels and crumble when cooled. Drain most of the fat from the pan and fry the garlic and onion. Lightly season with salt and pepper. Stir the bacon back in to the onion mixture and set aside.

2. Cook the pasta according to the instructions written on the packet. Add salt and olive oil to the water. Drain off water from pasta with colander, leaving just a little to prevent marcaroni from clumping together.

3. Meanwhile, in a large pot add the butter over medium-low heat. When the butter is half melted, add the flour and whisk to combine. When the butter is completely melted, add the milk and cook for 5-10 minutes until the mixture has reached the desired thickness.

4. Add the cheese and a 1-3 dashes of pepper to the butter and flour mixture and stir until it has melted. Add the bacon and onion mixture to the cheese sauce and stir for a good mix.

5. Add the drained pasta to the cheese sauce and stir until the pasta is well coated. Top with black pepper if desired. Sprinkle more parmesan and even lemon juice if preferred.

extracted off dishing up delights

Thursday, May 21, 2009

Cranberry almond multi-grain scones, carbonara sauce

this afternoon(20th may to be exact), i decided to try something new for my sister's birthday, which is none other than


scones!
serves 12-14

i've always digged scones ever since those pre-A level days where i would just study at KAP or guthrie and head for the confectionary section in cold storage when i needed a bite. of course this baking was assisted by analyn (the maid)

Ingredients:

1 egg
1/2 cup sugar (i used red man caster sugar cause i thought it would be better)
5 tablespoons grape seed or expeller-pressed canola oil (i used olive oil)

optional: 1/2 tsp almond extract
1/4 teaspoon lemon zest
1/2 cup oatmeal (not instant)
1/4 cup wheat bran (since i didnt have this, i just used more oatmeal and flour)
1 1/2 cups unbleached white flour (all purpose/ self-raising flour would do)
* 2 tablespoons millet
* 2 tablespoons poppy seeds

1 1/2 cup dried cranberries (or any other dried frut) (i actually used raisins and chocolate chips as substitutes)
1 cup almonds (or any other nut, preferably diced or in smaller pieces)
1/2 teaspoon salt
1 tablespoon baking powder
1/2 teaspoon cinnamon

1/4 teaspoon nutmeg (which can be excluded, to your preference)
1/2 cup milk (UHT fresh milk, HL milk, etc)

*not a fan of those seeds so i actually experimented and excluded millet and poppy seeds, and it turned out fine, but you could still include it in of course =)

ZESTY LEMON TOPPING:
3 tablespoons freshly squeezed lemon juice
1/4 cup confectioners' sugar (caster sugar as well)

1. Preheat oven to 190 deg cel.

2. Whisk the egg, sugar, almond extract, and oil together in a bowl. Mix the lemon zest and the flour, wheat bran, millet, poppy seeds, oats, baking powder, cinnamon, salt, and nutmeg together in a separate bowl and stir with a wooden spoon until all of them are evenly dispersed throughout.


3. Slowly add the dry ingredients into the egg, almond extract, sugar and oil, and mix to create a thick dough. Add the milk and mix well. Fold in your cranberries and almonds (or any other ingredients you think you would like)

4. Lightly grease a baking pan. Scoop up tablespoonfuls of the dough and drop them one by one in mounds onto the baking sheet (alternatively use a muffin/scones pan), leaving 2 inches of space between. (if you have those cupcake papers, you can actually place it into the pan to facilitate you removing the scones later) You should have about 12-14 scones. Bake for 15-20 minutes, just until the crust is barely golden brown and the dough is dry. Remove from the oven and let cool for 10 minutes.
(Be sure to allow the dough mix to cover the nuts/raisins to prevent them from being overcooked)


5. With a fork or a whisk, mix together the lemon glaze ingredients until the sugar is completely dissolved. Drizzle 1 tablespoon over each scone. (This step is really optional; my family actually prefers the original taste without the lemon, so its really up to your preference)


lemon juice with sugar


and, guess what. i mistook the 1 tsp of almond extract for 1tbsp. even as i was pouring it, i was asking my maid why do we have to put so much. sheesh )): so this batch has a real strong almond smell (almost pungent). and the texture of the scones are kinda in between muffins and the authentic hard ones, just like scoffins! so there :]

adapted off drweil :)


THEN, i also decided to make some carbonara sauce from scratch for her, different from jamie's. This recipe was given by joel's maid and is pretty good, (people who prefer their carbonara more creamy would like this over jamie's) just that i didnt really copy the proportions. its about agaration.

Carbonara sauce:

Steps:
1) Slice bacon into small chunks (or you could just use any meat balls)

2) Fry garlic for 0.5 mins, then add the onion in and fry for another minute.

3) Add the bacon in and fry till golden brown, leaving the onion and garlic to one side of the wok.


4) Stir everything together, adding in about 100ml UHT whipcream (Greenfield preferred, easily available in supermarkets).


5) Add chicken stock (ratio whipcream to stock 1:1) and stir together until mixture starts to boil.


6) Season with black pepper (even lemon juice and zest)

7) sieve in cornflour if you want it more creamy

8) Stir in the eggs (~2) right before it boils (this is an essential step cause you do not want to add the eggs in when the mixture is boiling or what you would get is small lumps of egg whites in the sauce)

8) Meanwhile, prepare pasta according to the instructions written on the packet.


I had to stir the pasta continuously to prevent the bottom from being burnt, together with the salt and oil for more taste and to prevent the noodles from sticking together respectively.

9) When the pasta is ready, take a colander and drain the water away, leaving just a little for the pasta to prevent it from drying up, at least till you serve it.


10) Separate the sauce from the pasta until before serving. this is to prevent the sauce from being absorbed by the pasta.


TA-DAA! maybe sprinkle parsley for garnish or even add some lemon juice to the noodles to whet your appetite.

all the best! =]

Wednesday, May 20, 2009

Chocolate fridge cake with pecan and meringues

This was my latest attempt for my mum on mother's day:


chocolate fridge cake!
serves 16

INGREDIENTS

200g digestive biscuits
110g whole pecans, roughly chopped (i used almond nuts as substitute)
110g pistachio nuts, peeled (i bought ready-peeled ones from phoon huat)
10 glace cherries (you can use different colour cherries to make it look more colourful, or even put raisins instead.)
2 ready-made meringue nests, smashed up ( i actually used meringue shell instead, available at cold storage)
150g unsalted butter
1 tablespoon golden syrup
200g dark chocolate


1) Break the biscuits into small pieces directly into a large bowl. Add the pecans, pistachio nuts and cherries and mix together. (although the ingredients didnt state to peel the cherries into small bits, i decided to do that so that it would be more evenly spreaded)

2) Put the rest of the ingredients into a separate, heatproof bowl and put on a low heat over a pan of simmering water until the butter and chocolate have melted. (because i used meringue shell, i had to pound the shell into fine bits first before adding to the mixture)

3) Combine the biscuit mix with the chocolate mixture.

4) Line a 30 x 20 cm plastic container with clingfilm, leaving plenty of extra film at the edges to help turn the cake out later. (alternatively, if you have those non-stick oven paper, just place it over your oven dish and pour the mixture over)
5) Whack everything into the container, place in the fridge to firm up then turn out and cut into chunky slices.


this is a very expensive cake (approximately $40) for someone collecting an allowance of mine, simply because of the pistachio and the various nuts. personally, i felt there was an overload of nuts so maybe you could cut down on the nuts if you are not an exact fan of nuts. but i must say, its very easy and no oven is required at all!

courtesy of
jamie oliver again :)

till then, everyone :]

Oreo Cheesecake

I got this recipe from a friend (charissa) when she brought the cake to school one day and actually attempted to make it for jo on valentine's this year, with alot of his help too, haha.


Oreo Cheesecake!
serves ~10

okay, the end product is definitely no where near the picture's. i actually got this picture off
back to the cutting boards and the difference between her cheesecake and mine is 1) the cake from my recipe is much bigger in circumference and height. 2) the cheese itself was filled with oreo crumbs but of course the amount of oreo is really subjected to personal preference =)

Cheesecake filling:
- 5 packets of cream cheese softened
- 1 cup white sugar
- 1 cup sour cream ( i actually used plain yoghurt as substitute cause i couldnt find the cream in the supermarkets)
- 3/4 milk or 1 cup irish cream
- 3 eggs
- 1 tsp vanilla essence
- 1 tube oreo broken into quarters
- 1 tube oreo grounded coarsely
- optional: 2 tsp gelatin

Oreo Crust:
- 5 tubes of oreos finely grounded (this is really subjective. my friend and i actually like oreo alot so we put more tubes)
- 3/4 cup melted butter

For the crust:

1) Blend oreos into crust. (Alternatively you could pound it manually)
2) Add just enough melted butter to oreos for sticky mixture
3) Press sticky oreo crumbs onto bottom and sides of 10 inch pan
4) Harden crust until required ( Im not very sure about this but i actually put it overnight in the freezer and it was really so hard to cut)

For the filling:

1) Mix cream cheese with sugar until smooth
2) Mix in sour cream (or yoghurt, in my case!)
3) Blend in milk/ irish cream
4) Mix in eggs, one at a time, mixing until enough to incorporate
5) Add in vanilla essence and mix
6) Blend in coarsely grounded oreo and oreo quarters
7) Pour batter into prepared oreo crust

Put into freezer and leave overnight.

this was an awesome cake but really fattening, haha. pretty expensive because of the cheese too(cheese alone easily amounted to about $25)! And the minus point is before you slice the cake, you actually have to take it out from the freezer for it to soften a lil first, but you must also be careful and not leave it out for more than 15 minutes or the top layer of cheese would start to melt. otherwise, definite must try for oreo and cheese lovers =]

Lovely lemon curdy pie

this was an attempt of a substitute cake i made for my dad on his bday this year.


Lemon curdy pie!
serves 4

then again, my end product didnt really look like this. i used a proper oven dish so it looked more rectangular and flatter. the bottom also didnt look so milky and cheesy. its a pity i dont have the habit of photographing what i bake or you would know what im referring to =)

Ingredients:

- 55g butter
- 115g sugar (vanilla sugar is nice)
- grated rind and juice of 1 lemon
- 2 large eggs (separate the yolk from the white)
- 55g self-raising flour
- 285ml milk (UHT fresh milk, HL milk, whichever you prefer)


1) Preheat the oven to 200ºC/400ºF/gas 6.

2) Cream the butter, sugar and lemon rind in a mixing bowl. Add the egg yolks and flour and beat in, then add the milk and 3 tablespoons of lemon juice and mix well.

3) Whisk the egg whites in a separate bowl until stiff, then add the rest of the mixture. Mix it all well but don't over-mix it; you don't want the air to come out of the egg whites. (at this point, the mixture looks so watery and you may worry that the proportions could have gone wrong, but dont worry, its meant to be like that!)

4) Pour into a buttered ovenproof dish, stand the dish in a roasting tin about a third full of water, then bake in your preheated oven for about 45 minutes until the top is set and spongy and it's a nice golden colour.

okay. what i really love about this dish besides the fact that its dead easy is also how people have often misunderstood this for a cheesecake. nope, no cheese at all! but i must say, some people may find this pie too 'soft' and 'watery' for their liking. i think refrigerating it could help alleviate the problem a little. overall, worthy cheesecake substitute! : )

once again, courtesy of jamie oliver cheers!

Apple Crumble

so with the first, naturally came the second attempt:


Apple Crumble!
serves 5

(okay, of which at this point i must make a disclaimer. what i like about
jamie is really that the pictures he uploaded on his site is what you get at home; but this picture, i would say is really doing unjustice to the end product, at least what i got which really looked brighter and certainly more appetizing)

Ingredients:

For the crumble:
• 35g rolled oats
(not the instant ones)
• 35g wholemeal flour
• 20g caster sugar
• 35g margarine or butter
(i usually use unsalted ones)

For the filling:
• 400g cooking apples, peeled, cored and quartered
• 50g sugar, to sweeten
• 1 tablespoon water


1) Preheat the oven to 190°C/375°F/gas 5.

2) Peel and core the apples, quarter and cut in to chunks.Put the apples in to a pan with the sugar and water. Cook over a low heat for 5 minutes and place in a small oven proof dish.

3) Place the flour and oats in a bowl and mix well. Cut the margarine or butter in to small cubes and add this to the oats and flour. Mix with your fingertips until it resembles an even crumb texture. Add the sugar and mix through. Cover the fruit with the crumble mixture.
(usually i would microwave the butter for ~20 secs to facilitate the melting)

4) Bake for approximately 20 minutes until the crumble is golden and the apple hot.
( the timing is subjective cause some of you may like it harder so you could put it in the oven for maybe 5 to 10 mins more)

(alternatively, you can refrigerate the end result and serve it cold)

one thing to note about this crumble is, i felt that there was simply too little crust, so i actually doubled the proportions of the crumble while keeping the fillings. another thing is, because there is no pastry at the bottom, take precaution when slicing cause it could easily fall apart. but otherwise, a simple and tasty dish worth trying =)

courtesy of
jamie oliver

Blooming brilliant brownies

My first ever attempt at dessert also back in dec (which i attempted thrice in the span of one month) :


brownies!
serves 20

simply Delicious with a capital D!

Ingredients:

• 250g unsalted butter
• 200g dark Fairtrade chocolate (70% cocoa solids), broken up ( if you dont fancy dark chocolates, you could use those with lesser cocoa components)
• optional: 75g dried sour cherries
• optional: 50g chopped nuts
• 80g cocoa powder, sifted
• 65g plain flour, sifted
• 1 teaspoon baking powder
• 360g caster sugar
• 4 large free-range or organic eggs
• optional: zest of 1 orange
• optional: 250ml crème fraîche

(for your direct reference, probably available at any NTUC etc)

1) Preheat your oven to 180°C/350°F/gas 4.

2) Line a 25cm square baking tin with greaseproof paper.

3) In a large bowl over some simmering water, melt the butter and the chocolate and mix until smooth. Add the cherries and nuts, if you’re using them, and stir together.

4) In a separate bowl, mix together the cocoa powder, flour, baking powder and sugar, then add this to the chocolate, cherry and nut mixture. Stir together well. Beat the eggs and mix in until you have a silky consistency.

5) Pour your brownie mix into the baking tray, and place in the oven for around 25 minutes. You don’t want to overcook them so, unlike cakes, you don’t want a skewer to come out all clean. The brownies should be slightly springy on the outside but still gooey in the middle.

6) Allow to cool in the tray, then carefully transfer to a large chopping board and cut into chunky squares. These make a fantastic dessert served with a dollop of crème fraîche mixed with some orange zest.


this is really one of my favourite brownies because if you follow the recipe (which really isnt too hard), the end result is really fool-proof. and i personally like the chewy texture (springy outside, gooey inside). highly recommended!

courtesy of jamie oliver

lemon linguine

the second dish i tasted (if i didnt remember wrongly was what joel attempted), which is


lemon linguine!
serves 6

relatively easy dish and certainly suitable for people who prefer the lighter alternative.

ingredients

• 500g dried linguine pasta
• juice of 3 Sicilian lemons and zest of 1
• 6 tablespoons extra virgin olive oil (normal oil would do fine)
• 125g Parmesan cheese, grated
• sea salt and freshly ground black pepper (normal salt is good)
• a large bunch of fresh basil, leaves picked and finely chopped (this is optional in my opinion, but of course the refreshing smell to the pasta is attributed to this)
• a handful of rocket (easily available at Cold storage)


1) Cook the linguine in a generous amount of boiling, salted water for about 12 minutes, then drain thoroughly and return to the saucepan. (could possibly add spoonfuls of oil to the water to prevent the noodles from sticking together. stir the noodles occasionally to prevent sticking.)

2) Meanwhile, beat the lemon juice and zest with the olive oil, then stir in the Parmesan – it’ll go thick and creamy. Season and add more lemon juice if needed.

3) Add the lemon sauce to the linguine and shake the pan to coat each strand of pasta with the sauce (the Parmesan will melt when mixed with the pasta). Finish by stirring in the chopped basil and the rocket.


see almost only three simple steps! one thing to note is not to add too much parmesan cause the cheese could possibly just cogulate together and become too lumpy for your likings.

courtesy of jamie oliver

sausage carbonara.

my virgin experience at cooking in dec 2008 last year during my hols, and its none other than


sausage carbonara!

serves 4

INGREDIENTS:

• 4 good-quality organic Italian sausages (of course you can easily substitute with meat balls easily purchased from NTUC, Cold Storage, etc)
• olive oil ( this is just a healthier alternative for your normal oil used at home)
• 4 slices of thickly cut pancetta, chopped
• sea salt and freshly ground black pepper (normal salt would do fine!)
• 500g dried linguine
• 4 large free-range or organic egg yolks (normal egg would go well)
• 100ml double cream ( purchased from Cold Storage)
• 100g freshly grated Parmesan cheese
• zest of 1 lemon (lemon really freshens the whole taste and makes it taste lighter, esp for people who find the taste of cheese pungent after awhile)
• a sprig of fresh flat-leaf parsley, chopped
• extra virgin olive oil (normal oil would do)


1) With a sharp knife, slit the sausage skins lengthways and pop all the meat out. Using wet hands, roll little balls of sausagemeat about the size of large marbles and place them to one side.
(Here, if we just use the meat balls as substitute, we could entirely skip this step)

2) Heat a large frying pan and add a good splash of olive oil. Gently fry the sausage meatballs until golden brown all over, then add the pancetta and continue cooking for a couple of minutes, until it’s golden.
( you could even add more bacon if you want)

3) While this is cooking, bring a pan of salted water to the boil, add the linguine, and cook according to the packet instructions.

4) In a large bowl, whip up the egg yolks, cream, half the Parmesan, the lemon zest and parsley. When the pasta is cooked, drain it in a colander, reserving a little of the cooking water, and immediately toss it quickly with the egg mixture back in the pasta pan. Add the hot sausage meatballs and toss everything together. The egg will cook delicately from the heat of the linguine, just enough for it to thicken and not scramble. The sauce should be smooth and silky.

5) If the pasta becomes a little claggy, add a few spoonfuls of the reserved cooking water to loosen it slightly.

6) Sprinkle over the rest of the Parmesan, season if necessary, drizzle with extra virgin olive oil and serve. Eat immediately!
(olive oil to prevent the noodles from sticking together. could even drizzle more lemon juice on the pasta)


i personally fancy this dish alot because i like carbonara and i wasnt disappointed :)

courtesy of jamie oliver

where foodies gather

hello : ) awesome.

decided to create this blog as a platform for friends and family alike to discuss and exchange recipes, but more importantly to serve its function of reminding me the food i've tried making/ tasted from friends so far. since i dont usually have a habit of taking pictures down, i would just rip them off their original sites for now.

enjoy :]